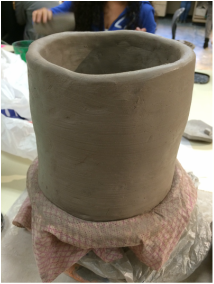
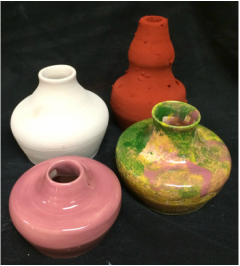
Wheel Thrown Bowl
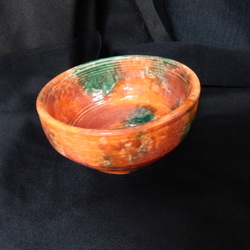
What: I am making a wheel-thrown bowl. This bowl is functional because it can hold water and it can function as a bowl. The purpose of this bowl is to hold soup or cereal or keys or candy if needed.
Why: I am making this bowl to get a good grade in pottery 3 and because I would like to make a set of bowls that I can use in the future. I made it tapered on the sides to make it look more like a flower pot to me because that looks professional in my opinion. Also I chose the colors and the randomness of the design because of inspiration from Emily.
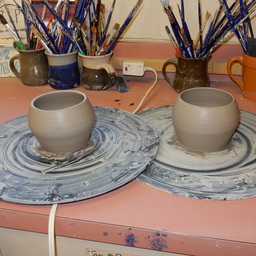
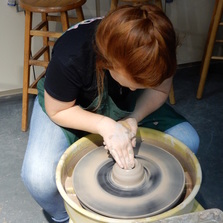
How: I started off this project just as one would start off any pottery project, by wedging plastic clay. I then rolled it into a ball and prepared my wheel. I wet the bat just a little in the center and slammed my ball of clay into the center of the bat. Then on the highest speed of the potter's wheel I centered the clay by pushing it towards the center and pulling up, then pushing it back down to the bat to make a tuna can shape. Centering the clay and keeping it centered is the hardest part of this project. From there I slowed the wheel and made my initial hole. After stopping the wheel and measuring the thickness at the bottom I turned back on the wheel and pulled out the walls to finish the base. Then I started to pull up the walls by first creating a shelf to put my fingers in to lift the walls. After I lifted the walls to my desired height I smoothed out the lip with a shammy and tapered the bottom of my bowl. Then I was finished and cut it off of the bat.
Why: I am making this bowl to get a good grade in pottery 3 and because I would like to make a set of bowls that I can use in the future. I made it tapered on the sides to make it look more like a flower pot to me because that looks professional in my opinion. Also I chose the colors and the randomness of the design because of inspiration from Emily.
How: I started off this project just as one would start off any pottery project, by wedging plastic clay. I then rolled it into a ball and prepared my wheel. I wet the bat just a little in the center and slammed my ball of clay into the center of the bat. Then on the highest speed of the potter's wheel I centered the clay by pushing it towards the center and pulling up, then pushing it back down to the bat to make a tuna can shape. Centering the clay and keeping it centered is the hardest part of this project. From there I slowed the wheel and made my initial hole. After stopping the wheel and measuring the thickness at the bottom I turned back on the wheel and pulled out the walls to finish the base. Then I started to pull up the walls by first creating a shelf to put my fingers in to lift the walls. After I lifted the walls to my desired height I smoothed out the lip with a shammy and tapered the bottom of my bowl. Then I was finished and cut it off of the bat.
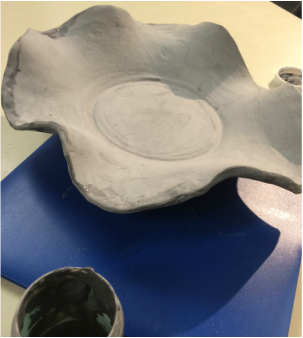
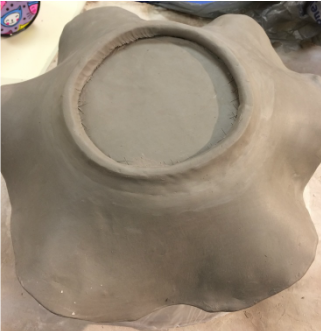
Charity Slab Bowl
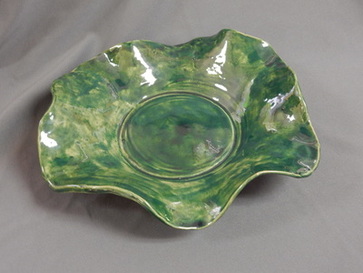
What: I am making a slab bowl for charity by using the hump mold method. This piece is both sculptural and functional. It will not hold water but it will hold solid objects like keys or candy for example. Also it's wavy lip makes it sculptural. The purpose of this piece is to be enjoyed in household.
Why: I am making this piece for charity. This is going to the Empty Bowls Charity event to be given away to any participants who come to the event. I made this with a wavy lip to be sculptural if it's taker chooses. Also I painted it a beautiful calm green color.
Why: I am making this piece for charity. This is going to the Empty Bowls Charity event to be given away to any participants who come to the event. I made this with a wavy lip to be sculptural if it's taker chooses. Also I painted it a beautiful calm green color.
|
How: I made this piece by first wedging my plastic clay slab and keeping it flat. Then I rolled out the slab to make it all an even width of about my pinky. Then I cut the edges to the shape I want and smoothed them out before putting the slab over the top of my bowl that I was using for the hump mold. I let the bowl get leather hard before rolling out a coil and attaching it for the foot. Waiting for the bowl to dry while on the mold takes a very long time. Then I let the whole thing dry before I scrubbed it and bisqued it. Then I applied two coats of the glaze and it was done. I should've put more than two coats of glaze.
|
|
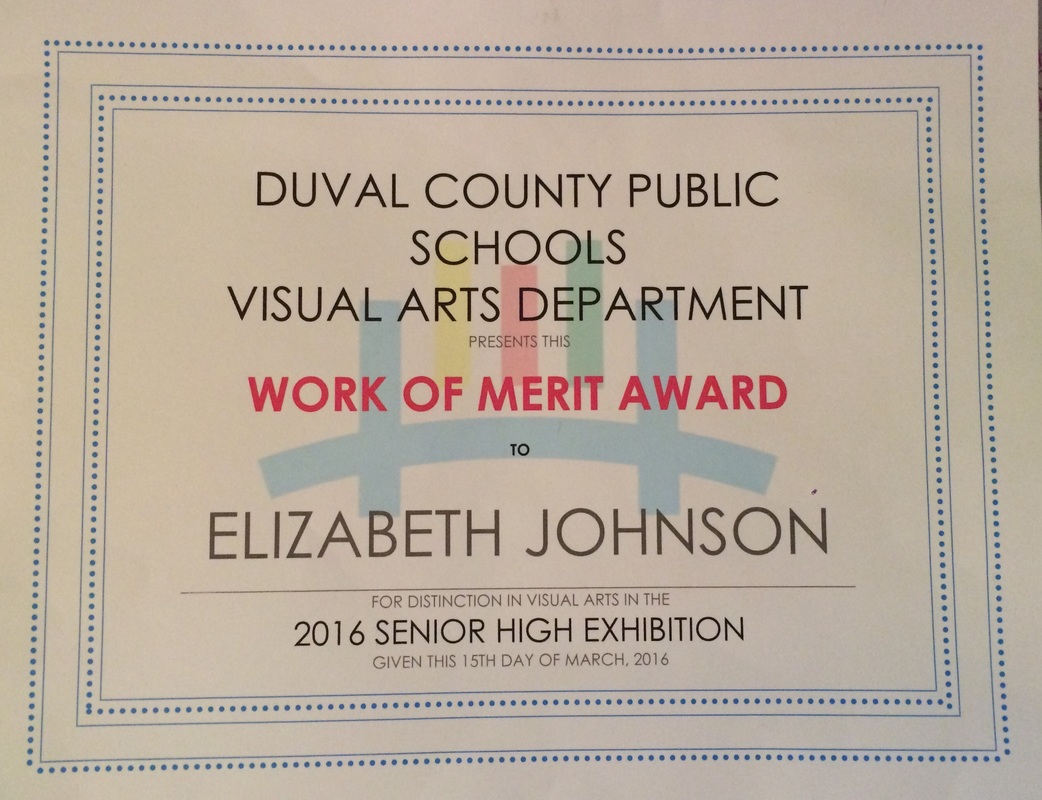
Negative Space Vessel

This project won a Work of Merit Award at the 2016 Senior High Exhibition! I couldn't be more happy!
|
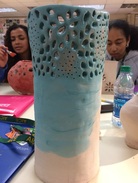
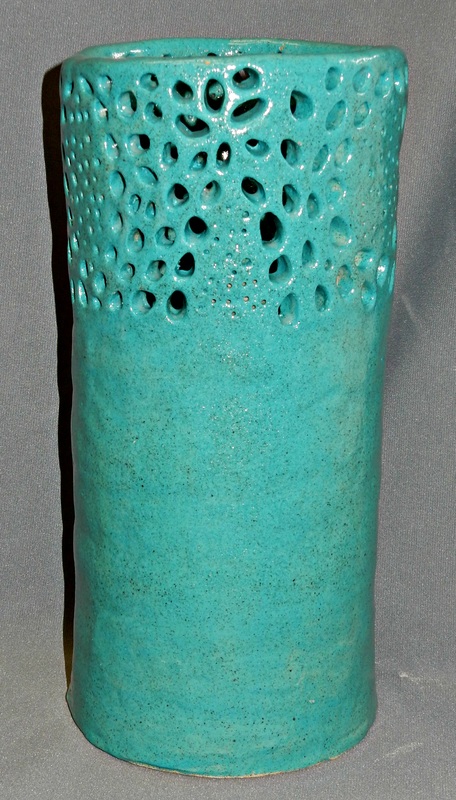
What: In this project I am making a vase that is decorated by adding negative space. Although the main goal of this project is to have holes in it I still wanted to make it functional so I made it rather large and only cut into a section. Its purpose is to teach us further about negative space in our projects and to encourage the use of negative space.
Why: I am making this vase to test out my limits when working with pottery. I made this vase as tall as I could and then attempted my holes. Once the vase would start to hit the top of the storage shelf when I moved it, I decided that it was tall enough. I decided to make this a very organic feeling piece even with big chunks of it missing. The negative space design flows around the artwork and the light blue color unifies all of the movement. How: In order to make this I started out like every other project and wedged plastic clay. I then rolled it out into a slab for the base of the artwork. Then one by one, I rolled out coils to build up the walls of my vase. Once I reached the desired height I let my project harden to become leather hard. I then lightly drew out my plan of holes into my piece before I actually cut through it for the first time. After I was satisfied I cut out all the holes and smoothed each one in, This was probably the hardest and most tedious part. Then after it was perfect I bisque fired it and began to paint it which was also tedious. Getting into every single tiny whole is harder than I thought. After glazing the piece was glaze fired and came out much darker than I expected. However, I still was very happy with the result. |

|
Matching Cups
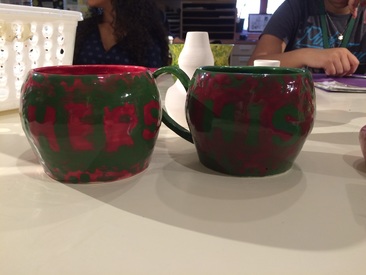
How: I made these cups on the wheel. I wedged my clay set up my wheel and started going. I centered the clay then made my initial hole and measured the bottom's thickness. Satisfied, I kept going by pulling up the walls and making the round shape. After finishing one, I did not cut it off the bat and started my next one, following the same steps. In order to match them I measured with calipers and adjusted the shape until they were nearly perfect copies. Then after letting them get leather hard I attached a handle to both. Sadly, while in the back room drying, one handle was knocked off and refused to allow another one to be attached. After I bisque fired them, I painted one green and one red with colored glaze. Then on the green one I painted "his" in red and on the red one I painted "hers" in green. After the last fire, they came out pretty well. The red was streaky but I like the texture it gives to the cup.
|
What: I am making two cups that match each other. They have to match in structure and not only color or design. This project is very functional and I could drink from these mugs. The purpose is to better ourselves and our throwing techniques to try to do the exact same thing twice. Also, this project is teaching us more about measuring our projects to fit with each other.
Why: I am making this particular piece because I want to have mugs when I am older. And if I can make all of my own mugs then that would be awesome. This is great practice for potentially making matching items in the future. I decided to paint these mugs red and green saying "his" and "hers" because I want to share them with my boyfriend. My boyfriend's favorite color is red and my favorite color his green. |
Vases/Bottles
What: In this project I am trying to make my first vase or bottle. This project would be very functional because it is a wheel thrown project aiming to nail down the technique of squeezing out a neck in a piece. The purpose of this project is to learn and master how to make a narrow shoulder and neck.
Why: I am making this particular vase/bottle because my best friend's grandpa died. I want to make her a small urn to carry to different countries when she travels to be able to spread his ashes around the world. |
|
How: This project is wheel thrown so my first step is to set up my wheel and wedge some clay into a small ball. Then I slam it down onto the bat and center it. Next I make my initial hole and measure the thickness at the bottom. Satisfied, I then continue to bring up the clay at the bottom to form the walls while keeping the clay very close to the middle. Once it is as tall as I would like, I set the wheel on a high speed and do the "a-okay" motion to squeeze in the neck wherever I decide for it to go. After using the chamois and tapering, I cut it off the bat. Then I let it dry, scrub it, and put it in to bisque fire. Then I pick which glaze I would like and paint it on. And once through the last fire, it is done. The end is the best part, seeing how the glaze came out.
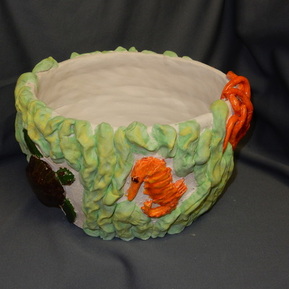
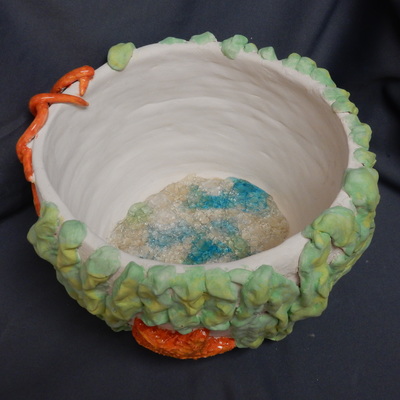
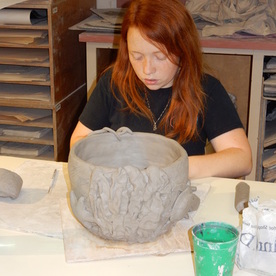
Ocean-Inspired

What: This project was given with the directions to do two things: make it ocean-inspired and it needs to be realistic. This project is functional and slightly sculptural. The project is a large bowl but the outside is decorated with appliques that can be seen as sculptural. Its purpose is to encompass the spirit of the ocean and to be placed in a beach house near the sea.
Why: I am making this piece to give as a gift. My boyfriend's great-uncle has recently bought and fixed up a beach house and he gave out keys to everyone in the family so that we can all use it if we would like. I made this bowl so when I go to the house I can leave it there as a small thank you for his gift. I wanted the gift to function as a bowl for him but to also be beautiful and make you want to go to the ocean when you see it. How: I am making this with the coil method. Firstly and most importantly I wedge all my clay. Next I roll out a flat slab and cut it into a circle of the size I would like. Then I start rolling out coils, scoring and slipping them on to one another to build the walls. Once I finished building the bowl which is also the base for my project, I use pictures for reference as I make my appliques. I made a starfish, sea turtle, an octopus, a seahorse, and tons of seaweed. I scored and slipped the whole pot on the outside and the appliques and attached them together. After my project dried and went through the bisque fire I picked glazes and underglazes that would look the most realistic. Sadly, my octopus head fell or broke off and I had to make a new one. I glazed that too and put it all through the last firing. Then I will just glue the head on later. |
|
FREE CHOICE
|
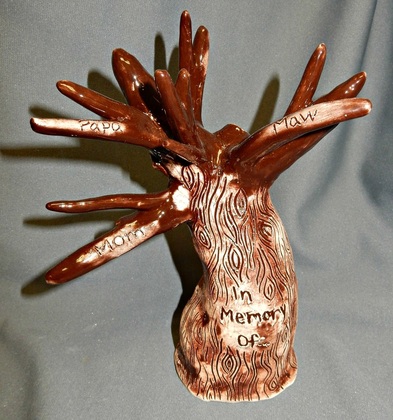
What: This project was left totally up to us, with only one requirement: it must have some sort of meaning. I immediately wanted to broaden my abilities and do something I have not ever done in my art career: make a completely sculptural piece. My purpose for this piece was to make it look really sculptural and pretty while also incorporating a meaning into it.
Why: I am making a tree of life to celebrate the lives of those family members which I have lost. I want to draw on the branches their names and put it somewhere around my house where everyday I will see it and remember my loved ones. How: I made this project out of coils (of course). I did not make a bottom for this one because the top would be closed and if I closed the bottom as well then it would blow up while being fired. I started with just a coil formed into a circle and the slipped more on top of that. At a good four or five inches from the table I started making two sections of coils going left and right to start the tree branches. After finishing and closing those branches I made some small coils and just scored and slipped them right onto the project. I kept adding more until I was satisfied with the look. Then I let it dry some and drew with a pencil the lines that appear as tree bark texture. I then scrubbed the piece and fired it in the bisque fire. After the bisque fire I found brown colored glaze and painted it on. Then I wiped away the glaze to really emphasize the texture and the words. Then I put it in the last firing and I was done. |
|
